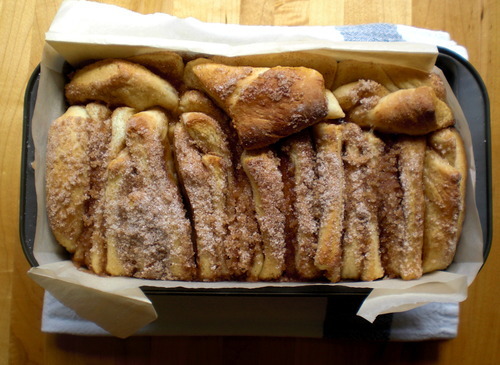
The first post, nerves and jitters all around.
Hopefully this blog will only get better with age, time and experience. It is a big commitment, especially for someone who forgets to take pictures. (And who wants to look at a food blog without the pictures?!) I like to think of them as never ending picture books for cooks and food enthusiasts.
But now down to the important stuff..
For the first post: Pull Apart Cinnamon Bread! nom nom
This recipe is from Joy the Baker, if you’re not familiar with her, I highly suggest checking her out
here!
CINNAMON SUGAR PULL APART BREAD:

For the Dough:
3 cups all-purpose flour
1/4 cup granulated sugar
2 1/4 teaspoons (1 envelope) active dry yeast
1/2 teaspoon salt
2 ounces unsalted butter
1/3 cup whole milk (I used 2%)
1/4 cup water
2 large eggs, at room temperature
1 teaspoon pure vanilla extract
For the Filling:
1 cup granulated sugar
2 teaspoons ground cinnamon
1/2 teaspoon fresh ground nutmeg
2 ounces unsalted butter, melted until browned
1. In a large mixing bowl whisk together 2 cups flour, sugar, yeast, and salt. Set aside.
2. Whisk together eggs and set aside.
3. In a small saucepan, melt together milk and butter until butter has just melted. Remove from the heat and add water and vanilla extract. Let mixture stand for a minute or two, or until the mixture registers 115 to 125 degrees F. (I just eyeballed this, since I don’t have a thermometer).
Add the milk mixture into the dry ingredients and mix. Add the eggs and stir the mixture until the eggs are incorporated into the batter. The eggs will feel soupy and the dough will look very wet, but keep stirring. Add the remaining 3/4 cup of flour and stir for about 2 minutes. The mixture will be sticky. That’s just right.
4. Place the dough in a large, greased bowl. Cover with a clean kitchen towel. Place in a warm space and allow to rest until doubled in size, about 1 hour. (Since my kitchen is usually on the cool side, I warm up my oven for a few minutes then turn it off and place the covered dough inside with the oven door cracked a bit)
* For use in the morning, dough can be risen until doubled in size, then refrigerated overnight. If you’re using this method, just let the dough rest on the counter for 30 minutes before following the roll-out directions below.
5. While the dough rises, whisk together the sugar, cinnamon and nutmeg for the filling. Set aside. Melt 2 ounces of butter until browned. Set aside. Grease and flour a 9x5x3-inch loaf pan OR line with a piece of parchment paper for a less messy/buttery situation. Set that aside too.
6. Deflate the risen dough and knead about 2 tablespoons of flour into the dough. Cover with a clean kitchen towel and let rest for 5 minutes. On a lightly floured work surface, use a rolling pin to roll the dough out. The dough should be 12-inches tall and about 20-inches long. If you can’t get the dough to 20-inches long… that’s okay. Just roll it as large as the dough will go. Use a pastry brush to spread melted butter across all of the dough. Sprinkle with all of the sugar and cinnamon mixture. It might seem like a lot of sugar. (But in the end it is just the right amount!!)
7. Slice the dough vertically, into six equal-sized strips. Stack the strips on top of one another and slice the stack into six equal slices once again. You’ll have six stacks of six squares. Layer the dough squares in the loaf pan like a flip-book. Place a kitchen towel over the loaf pan and allow in a warm place for 30 to 45 minutes or until almost doubled in size.
8. Place a rack in the center of the oven and preheat to 350 degrees F. Place loaf in the oven and bake for 30 to 35 minutes, until the top is very golden brown. The top may be lightly browned, but the center may still be raw. A nice, dark, golden brown will ensure that the center is cooked as well.
9. Remove from the oven and allow to rest for 20 to 30 minutes. Run a butter knife around the edges of the pan to loosen the bread and invert onto a clean board OR if using parchment paper, simply take the bread out. Serve warm with coffee or tea.
Bread is best served the day it’s made, but it can also we wrapped and kept at room temperature for up to 2 days!
**May I also suggest playing around with the spices and adding little nuggets of fruit? Maybe some apple slices or raisins?


